This handheld laser marking machine manual explains the basic safety rules, machine parameters, marking workflow, text and serial-number editing, QR and barcode creation, red-light positioning, parameter adjustment, production-line functions, file management, maintenance and common operating checks. The supplied manual covers 20W, 30W and 50W configurations.
Start With Quick Setup View Specifications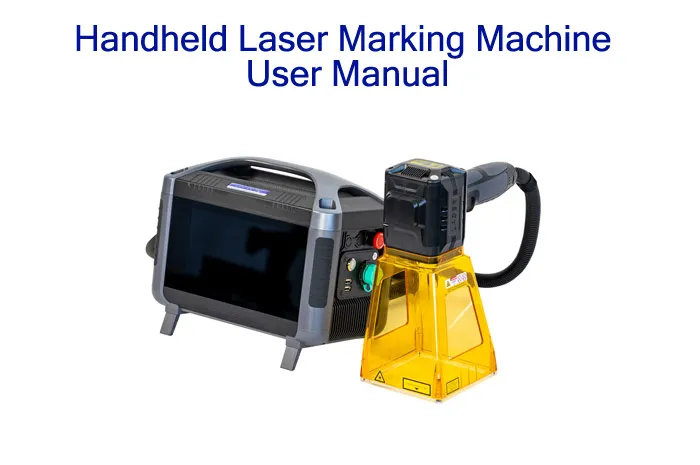
Read This Before Operating the Machine
This equipment uses a laser source whose emitted radiation exceeds Class 1 levels according to the supplied manual. Do not expose eyes or skin to the laser beam or reflected laser radiation.
The supplied manual recommends protective eyewear with an optical density of OD3. Follow the laser safety requirements applicable to your installation and country before operating the machine.
Never aim the laser head toward people or animals. Do not operate the machine with damaged components, unauthorized replacement parts, or modified safety systems.
The safety information on this page is based primarily on the supplied handheld laser marking machine manual. Operators must also follow the applicable local laser, electrical, workplace and fire-safety requirements.
What Is a Handheld Laser Marking Machine?
A handheld laser marking machine is a compact fiber laser marking system designed for applications where the operator needs portability and direct access to the workpiece rather than a conventional fixed desktop enclosure.
The supplied manual covers a fiber laser generator, integrated control electronics, an 8-inch capacitive touchscreen, Linux operating system, red-light positioning/focusing and an optional battery-powered configuration.
According to the manual, the system supports both dot-matrix and vector marking/engraving, fixed text, serial numbers, date/time information, graphics, barcodes and QR codes. :contentReference[oaicite:2]{index=2}
Handheld Laser Marking Machine Manual Contents
- Technical Specifications
- Safety Instructions
- Quick Start
- Touchscreen & System Interface
- Creating a Marking File
- Serial Number Marking
- Barcode & QR Code Marking
- File Management & USB
- Red Light Positioning & Calibration
- Marking Parameters
- Production Line Functions
- Cleaning & Maintenance
- Battery Version
- Troubleshooting
- FAQ
Handheld Laser Marking Machine Technical Specifications
The following specification table is transcribed and organized from the supplied 129-page user manual. Because the manual states that output power depends on the purchased model, the exact machine configuration should always be checked against the machine nameplate and commercial quotation.
| Item | Specification in Supplied Manual |
|---|---|
| Applicable Models | 20W / 30W / 50W |
| Laser | Fiber Laser Generator, second generation |
| Output Power | Depends on purchased model |
| Wavelength | 1064 nm |
| Marking Range | 70 × 70 mm or 100 × 100 mm, optional |
| Scanning System | High-precision two-dimensional scanning system |
| Focus Lens | 130 mm |
| Marking Speed | < 7000 mm/s |
| Master Control | Integrated motherboard with 8-inch capacitive integrated screen |
| Operating System | Linux |
| Marking / Engraving Type | Dot-matrix and vector |
| Line Width | 0.03 mm |
| Repeatability | 0.01 mm |
| Positioning | Red-light positioning and focusing |
| Character Lines | Any number of lines within the effective marking range |
| Print Speed Reference | Up to 800 characters, depending on material and marking content |
| File Formats | BMP, DXF, PNG, JPEG, PLT |
| Barcode Support | CODE 2-of-5 Interleaved, CODE39, CODE128, CODE126, QR, Codabar, CODE93, UPC-A, UPC-E, EAN-14, ITF-14, EAN128 |
| Power Supply | 110V / 220V AC; lithium battery version available |
| Battery Capacity | 20W / 30W: 216Wh; 50W: 333Wh |
| Overall Power Consumption | 145–250W |
| Operating Temperature | 0–40°C |
| Machine Weight | 20W / 30W: 6–6.8 kg; 50W: 8–8.8 kg |
| Packaging Size |
20W / 30W: 525 × 423 × 310 mm 50W: 525 × 420 × 340 mm |
| Packaging + Machine Weight |
20W / 30W: 8–10 kg 50W: 10–12 kg |
Source: supplied Handheld Laser Marking Machine User Manual, Equipment Parameters section. :contentReference[oaicite:3]{index=3}
Laser Safety Instructions
Safety is the first section an operator should read. The supplied manual specifically warns that improper operation can cause fire, property damage or personal injury.
Laser Exposure
- Never look directly into the laser beam.
- Do not expose eyes or skin to direct or reflected laser radiation.
- Never point the marking head toward a person or animal.
- Use the recommended protective eyewear.
- Do not bypass safety controls.
Machine Handling
- Do not drop or strike the machine.
- Do not place heavy objects on the machine.
- Do not insert wires or metal objects into the housing.
- Keep liquids away from the machine.
- Turn power off before connecting or disconnecting modules.
Environment
- Normal operating temperature: 0–40°C.
- Avoid strong static or magnetic-field environments.
- Keep ventilation openings free from excessive dust.
- Keep the machine dry.
- Avoid prolonged use in rain or high-humidity environments.
Unauthorized Components
- Use designated charging equipment for battery versions.
- Do not replace components with unapproved parts.
- Contact after-sales support when internal service is required.
- Do not modify the laser system without authorization.
These requirements are derived from the supplied manual’s safety and product-usage sections. :contentReference[oaicite:4]{index=4}
Quick Start: How to Use the Handheld Laser Marker
For a first-time operator, the safest approach is to separate the workflow into preparation, positioning, test marking and production.
01 · Inspect
Check the machine, power connection, marking head, controls, ventilation openings and work area before starting.
02 · Power On
Turn on the machine according to the delivered configuration and wait for the operating interface to load.
03 · Load File
Create a new marking file or open a saved file from internal storage or USB.
04 · Position
Use the red-light positioning/focusing function to preview the marking position and working area.
05 · Test
Confirm the marking area, material and parameter settings before starting production.
06 · Mark
Start marking only after confirming the workpiece position and laser safety conditions.
8-Inch Touchscreen and System Interface
The supplied manual describes an integrated 8-inch capacitive screen running a Linux-based operating system. The home interface provides system status, marking information, editing functions and start/pause controls.
| Function | Purpose |
|---|---|
| System Status | Shows ready, marking status and error/alarm information. |
| Refresh / Online Update | Updates marking content during production when configured. |
| Focus Light | Used with the applicable dual-red-light focusing configuration. |
| Guide Light | Previews the marking area using red light. |
| Test | Checks the marking time for the selected data. |
| Marking Information | Displays file, content, marking time, count and related production information. |
| Reset Serial Number | Resets the serial-number sequence without stopping production when configured. |
| Clear Alarm | Clears displayed alarm information. |
| Start / Pause | Controls the marking process. |
The manual specifically notes that online content updates during high-speed production should be handled carefully because real-time updates can cause missed marking in some production conditions. :contentReference[oaicite:5]{index=5}
How to Create a Marking File
The editing interface supports fixed text, serial numbers, date/time, external data, random codes and graphical objects.
Text
Add fixed text and select from available font types including dot-matrix, single-line and double-line fonts.
Serial Number
Configure start value, end value, current value, step value, character count, repetition and reset behavior.
Date & Time
Add date/time information for production identification and coding applications.
Graphics
Add points, lines, circles, rectangles and imported graphics.
Barcode
Create supported linear barcode formats from the system interface.
QR Code
Create QR codes for product identification and traceability applications.
The supplied manual lists fixed text, serial number, date/time, file read, plan, external data and random code functions in its editing system. :contentReference[oaicite:6]{index=6}
Serial Number Marking
Serial-number marking is one of the more useful functions when the same product must receive a unique identification number during production.
| Setting | Function |
|---|---|
| Start Value | Defines the starting serial number. |
| End Value | Defines the final serial number. |
| Step Value | Defines the increment between markings. |
| Number of Digits | Controls serial-number character length. |
| Repeat | Allows the same serial number to be marked multiple times. |
| Cycle | Controls whether the sequence continues cyclically. |
| Reset | Allows the serial number to return to the defined starting value. |
| Output Signal | Can be configured for serial-number-related output signals. |
These functions are described in the manual’s serial-number editing section. :contentReference[oaicite:7]{index=7}
Barcode and QR Code Marking
The manual lists support for multiple barcode formats and QR codes. This makes the system suitable for basic product identification, serial-number and traceability workflows.
| Code Type | Examples Listed in Manual |
|---|---|
| Linear Barcodes | CODE39, CODE128, CODE93 |
| Industrial / Logistics Codes | ITF-14, EAN-14, EAN128 |
| Retail Codes | UPC-A, UPC-E |
| QR | QR Code |
| Other Listed Formats | Codabar, CODE 2-of-5 Interleaved, CODE126 |
File Management and USB Operation
The machine can manage marking files internally and exchange files with a USB drive.
Open
Open files stored in internal system storage or USB.
Save
Save the current marking file.
Save As
Save the current file under another name.
Copy
Copy files between internal storage and USB.
Paste
Paste copied files into the selected location.
Delete / Rename
Manage existing marking files.
The manual specifically describes copying files from internal storage to USB and copying USB files back into the machine. :contentReference[oaicite:8]{index=8}
Red Light Positioning and Focusing
Red-light positioning allows the operator to preview where the marking content will be placed before the laser marking process starts.
Red Light Guide Calibration
- Create a reference rectangle in the marking file.
- Activate the red-light guide function.
- Adjust the offset and scale.
- Make the red-light guide coincide with the actual marking area.
The manual describes a separate two-red-light focusing method when the machine is equipped with two red lights: one fixed and one adjustable. The two red-light positions are adjusted until they coincide. :contentReference[oaicite:9]{index=9}
Marking Parameters Explained
The supplied manual identifies several important marking parameters. These settings should be changed according to the material and marking requirement rather than copied blindly from another job.
| Parameter | What It Controls | Practical Meaning |
|---|---|---|
| Marking Speed | Writing speed of the laser focus | Higher speed can reduce processing time but may change marking energy. |
| Jump Speed | Movement speed between marking vectors | Too much or too little can affect total cycle time and positioning behavior. |
| Power | Relative laser power | Higher value increases laser energy; the manual recommends not exceeding 90% during use. |
| Frequency | Laser pulse frequency | Changes the pulse behavior and therefore can affect the marking result. |
| Jump Delay | Delay after movement | Too short can create positioning artifacts; too long increases marking time. |
| Laser-On Delay | Delay before laser output | Incorrect setting can create poor vector starting points. |
| Laser-Off Delay | Delay after marking command | Incorrect setting can cause incomplete or burned vector ends. |
| Corner Delay | Corner processing timing | Needs to be matched with speed and the required marking quality. |
The manual specifically explains that delay parameters must be matched to jump and marking speeds. Excessively short or long delays can produce incomplete vectors, excessive heat/coking or longer marking times. :contentReference[oaicite:10]{index=10}
Production Line and Trigger Functions
Although this is a handheld machine, the supplied control system also contains functions for sensor-triggered and production-line marking.
Static Marking
Static marking can use jog mode or sensor/foot-switch mode. The manual describes foot-switch triggering in jog mode and sensor-triggered operation in sensor mode. :contentReference[oaicite:11]{index=11}
Flight Marking
Flight marking is intended for moving products. The system can use an encoder to synchronize with conveyor movement, or use a simulated line speed when an encoder is not enabled.
| Mode | Purpose |
|---|---|
| Normal Mode | Sensor-based marking with defined sensor distance. |
| Pipeline Mode | Marks products according to defined starting and spacing distances. |
| Continuous Mode | Repeated marking according to sensor state and configured spacing. |
The manual describes these three production-line marking modes and their sensor-distance, starting-position and mark-spacing settings. :contentReference[oaicite:12]{index=12}
Learn About Conveyor Laser MarkingIO and External Integration
The control system includes configurable input and output functions. The supplied manual describes five IO signal inputs/outputs and multiple production-related signals.
Output Functions
- Marking ready
- Marking output
- Marking completed
- Serial number end
- Fault output
- Manual output control
Input Functions
- Reset serial number
- Start / stop processing
- Interlock detection
- External equipment signals
- Press-and-hold processing
- Conditional triggering
The manual also describes security-door input behavior and external interlock-related functions. Specific wiring should be performed only according to the supplied electrical documentation or by qualified personnel. :contentReference[oaicite:13]{index=13}
Battery-Powered Handheld Laser Marking Machine
The supplied manual includes a battery version. Battery capacity is listed as 216Wh for 20W/30W models and 333Wh for the 50W model.
| Model | Battery Capacity | Machine Weight |
|---|---|---|
| 20W | 216Wh | 6–6.8 kg |
| 30W | 216Wh | 6–6.8 kg |
| 50W | 333Wh | 8–8.8 kg |
The supplied manual also specifies battery storage and transportation precautions, including keeping the machine dry and away from heat sources.
Cleaning and Maintenance
Handheld equipment is often used in workshops where dust, oil and metal particles are present. Basic cleaning is therefore part of normal operation.
Daily / Regular Checks
- Check ventilation openings.
- Remove accumulated dust.
- Keep the touchscreen clean.
- Check the machine housing for impact damage.
- Check cables and connectors before use.
Cleaning
- Use dry, non-abrasive gauze for normal cleaning.
- Use appropriate screen-cleaning products when deeper cleaning is needed.
- Do not allow water or corrosive/conductive liquids into the machine.
- Do not spray liquid directly into ventilation openings.
The manual specifically recommends dust removal from heat-dissipation openings and dry cleaning procedures. :contentReference[oaicite:15]{index=15}
Storage and Transportation
| Situation | Recommended Practice |
|---|---|
| Long-Term Storage | Keep the machine dry and away from heat sources. |
| Children | Keep the machine out of children’s reach. |
| Battery | Avoid prolonged storage with a severely low battery. |
| Humidity | Avoid damp or potentially leaking storage areas. |
| Transport | Follow applicable battery transportation requirements. |
| Air Travel | The supplied manual states that the machine cannot be carried on board. |
The supplied manual contains specific battery storage, transportation and disposal instructions. Local transportation regulations should also be checked before shipping battery-equipped equipment. :contentReference[oaicite:16]{index=16}
Handheld Laser Marking Machine Troubleshooting
| Problem | First Checks | Recommended Action |
|---|---|---|
| No marking result | Power, marking file, trigger state and system alarm | Stop operation and check system status before further testing. |
| Mark position is wrong | Workpiece position, focus and red-light guide | Check positioning and calibration settings. |
| Mark is incomplete | Speed, laser-on/off delay and marking parameters | Review parameter matching before changing hardware. |
| Vector starts with excessive heat | Laser-on delay and speed | Optimize delay and marking speed. |
| Vector ends incorrectly | Laser-off delay | Check turn-off delay settings. |
| Marking time is too long | Marking speed, jump speed and delay settings | Optimize parameters without sacrificing mark quality. |
| Sensor does not trigger marking | Sensor enable state and trigger polarity | Check sensor settings and wiring. |
| Flight marking is distorted | Encoder / simulated line speed | Verify conveyor speed and flight coefficient. |
| Machine overheats | Ventilation openings and environment | Stop if necessary, allow cooling and clean ventilation openings. |
| Battery performance is poor | Battery level, storage condition and temperature | Follow the battery charging and storage instructions. |
The delay-related troubleshooting above follows the supplied manual’s explanation of excessive or insufficient jump, laser-on and laser-off delays. :contentReference[oaicite:17]{index=17}
Who Is a Handheld Laser Marking Machine Suitable For?
Large Metal Parts
Useful when moving the complete workpiece to a fixed marking machine is inconvenient.
Automotive Components
Suitable for identification marking on large or awkward metal components, subject to material and application testing.
Machine Components
Useful for logos, model numbers, serial numbers and traceability information.
Metal Hardware
Suitable for marking tools, fittings, plates and other metal products when portability is valuable.
On-Site Marking
Battery configuration can be useful where a conventional fixed workstation is difficult to use, subject to the required safety setup.
Small-Batch Production
Useful when different products need to be marked without building a dedicated automated production line.
When a Handheld Machine May Not Be the Best Choice
Handheld does not automatically mean better. If the application is a high-volume production line with controlled part positioning, a fixed automatic marking system may be more appropriate.
| Application | Possible Better Configuration |
|---|---|
| Thousands of identical parts per shift | Automatic conveyor laser marking |
| Very consistent part positioning required | Dedicated fixture / automation |
| Automatic code inspection required | Laser + vision inspection |
| Continuous production line | Flying laser marking system |
| Small flat parts | Desktop fiber laser may be more convenient |
| Heat-sensitive plastics | UV laser should be evaluated |
What Should You Confirm Before Buying a Handheld Laser Marker?
Machine Configuration
- 20W / 30W / 50W
- 1064 nm fiber laser
- 70×70 or 100×100 mm marking field
- 130 mm focus lens
- Battery or AC configuration
Your Application
- Material type
- Part dimensions
- Marking size
- Required depth
- Required contrast
- Parts per hour
Software Requirements
- Text
- Serial numbers
- QR codes
- Barcodes
- External data
- USB file transfer
Support
- Installation guidance
- Operator training
- Parameter support
- Troubleshooting
- Spare parts
- After-sales support
Handheld Laser Marking Machine FAQ
What power options are covered by this manual?
The supplied manual applies to 20W, 30W and 50W handheld laser marking machine configurations.
What wavelength does the handheld laser use?
The equipment parameter section of the supplied manual specifies a 1064 nm fiber laser.
What is the marking area?
The manual lists 70×70 mm and 100×100 mm marking ranges as optional configurations.
How fast can the handheld laser marking machine mark?
The equipment specification lists a marking speed of less than 7000 mm/s. Actual production speed depends on the material, marking content, parameters and process requirements.
Does the machine support QR codes?
Yes. QR code creation is included in the marking software described in the supplied manual.
Can I mark serial numbers?
Yes. The system supports configurable serial-number functions including start value, end value, step value, repetition and reset functions.
Does it support a USB drive?
Yes. The manual describes opening, copying and transferring marking files between internal storage and USB.
Does the handheld machine have a battery version?
Yes. The manual lists a battery-powered configuration with 216Wh for 20W/30W and 333Wh for 50W.
What is the machine weight?
The manual lists approximately 6–6.8 kg for 20W/30W and 8–8.8 kg for 50W configurations.
Can the handheld laser be used on a production line?
The supplied control system includes sensor, foot-switch, pipeline, continuous and flight-marking functions. Encoder synchronization is also described for flight marking.
What should I do if the marking position is inaccurate?
First check workpiece positioning, focusing and red-light guide settings. If the issue remains, follow the supplier’s calibration procedure rather than changing optical settings randomly.
How should I clean the machine?
The supplied manual recommends dry, non-abrasive gauze for normal cleaning and keeping liquids away from the machine. Ventilation openings should also be kept free from excessive dust.
Can I repair the laser source myself?
Internal laser, optical and electrical repairs should not be treated as normal operator maintenance. Contact the supplier or qualified service personnel for internal repair requirements.
Related JQ Laser Resources
Handheld Laser Marking Machine
View the product information and configuration options.
View Handheld Laser Machine →Portable Laser Marking Machine
Compare portable marking solutions for large or difficult-to-move parts.
View Portable Laser Marking →Fiber Laser Marking Machine
Compare standard 20W–100W fiber laser marking configurations.
View Fiber Laser →Installation & Training
Learn how JQ Laser supports installation, software setup and operator training.
Installation & Training →Automatic Laser Marking
For conveyor, sensor, PLC and automated production applications.
Automatic Laser Marking →
Technical Content by LEO — JQ Laser Sales Engineer
LEO works with manufacturers on laser marking applications, machine configuration, material testing and automation projects. His role includes helping customers translate marking requirements into practical machine configurations and production workflows.
Jining Junqi Intelligent Technology Co., Ltd. · JQ Laser
Need the Manual for Your JQ Handheld Laser?
If you are buying or already operating a JQ handheld laser marking machine, send us your machine model, laser power and the problem you are trying to solve. Our technical team can help identify the relevant operating procedure, marking parameters or maintenance step.
Talk to a Laser Engineer View Handheld Laser MachineManual Source & Version Notes
This web guide is based on the English-language handheld laser marking machine manual supplied for this page. The supplied document is 129 pages and lists 20W/30W/50W applicable models.
The original document contains detailed screen-by-screen instructions, figures and advanced system settings. This webpage reorganizes those instructions into a searchable operating guide rather than reproducing the entire PDF page by page.
For machine-specific electrical wiring, optical calibration, laser-source service, registration and internal repairs, use the documentation delivered with the actual machine and contact JQ Laser technical support when required.
Primary technical source: Handheld Laser Marking Machine User Manual, supplied PDF, 129 pages.