Automatic Laser Marking Machine with Rotary Axis
An automatic laser marking system designed for cylindrical, round and irregular parts. With a rotary axis, the laser can mark logos, serial numbers, QR codes, barcodes and other permanent identification around curved surfaces with controlled positioning and repeatability.
What Is an Automatic Laser Marking Machine with Rotary Axis?
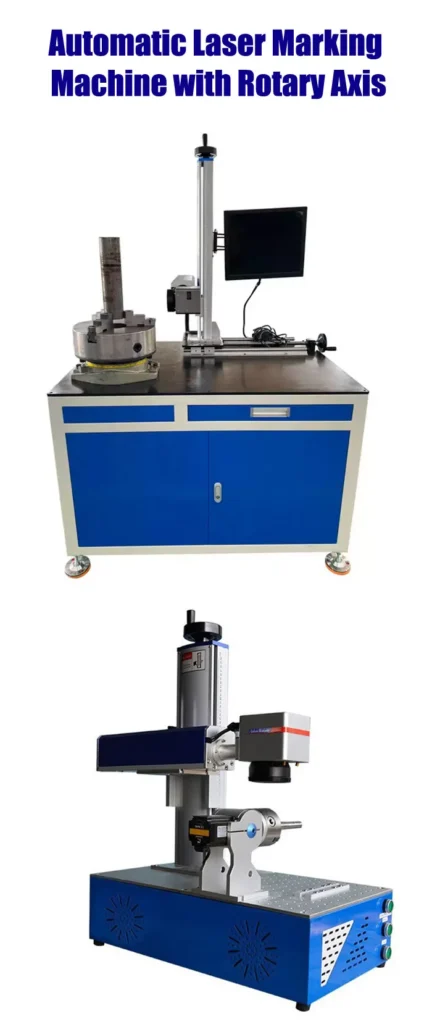
An automatic laser marking machine with rotary axis combines a laser marking system with a motorized rotary attachment. Instead of keeping a cylindrical or round workpiece fixed while trying to project a flat marking pattern onto its surface, the rotary axis rotates the part during the marking process.
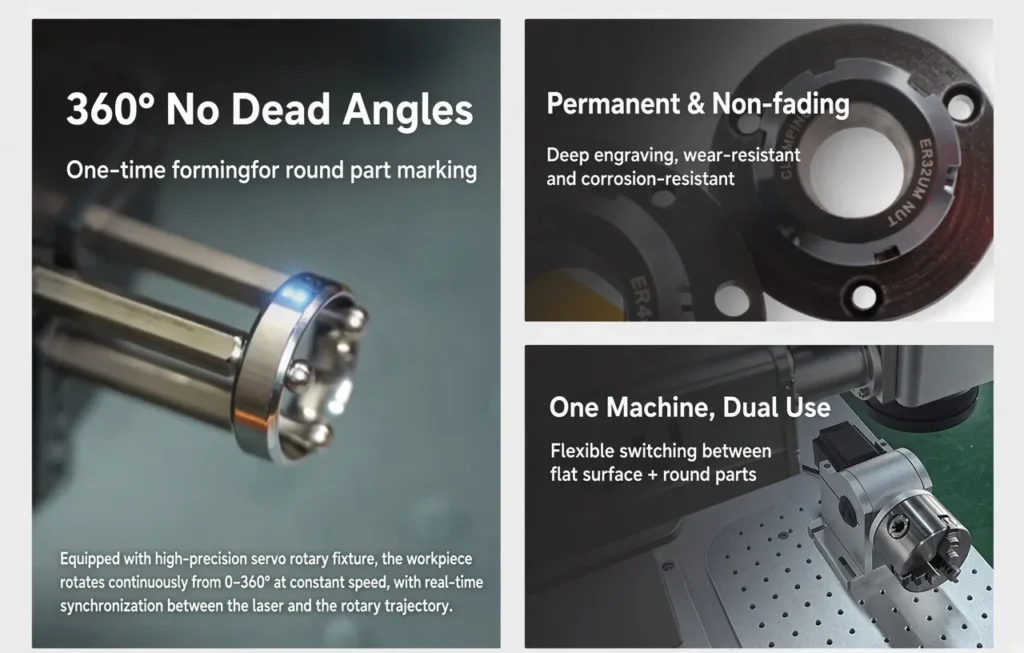
This configuration is particularly useful for bottles, tubes, shafts, rings, cylindrical metal components, tools, bearings and other round products. The rotary axis can synchronize the rotation of the workpiece with the laser marking path, allowing logos, serial numbers, text, barcodes and other graphics to be positioned around a curved surface.
The exact rotary configuration depends on the product diameter, length, marking area, required coverage and production method. For higher-volume applications, the rotary axis can also be combined with sensors, fixtures, PLC control, conveyors or other automation components.
Why Use a Rotary Axis for Laser Marking?
Mark Around Cylindrical Surfaces
A rotary axis rotates the workpiece so the laser can mark a controlled area around cylindrical or round surfaces.
Improve Position Consistency
A dedicated fixture and rotary motion can provide more repeatable positioning than manually rotating individual parts.
Reduce Manual Handling
The operator can load the workpiece into a repeatable fixture instead of manually repositioning the product for different marking locations.
Support Variable Data
Rotary marking can be combined with serial numbers, QR codes, Data Matrix codes and other product identification data.
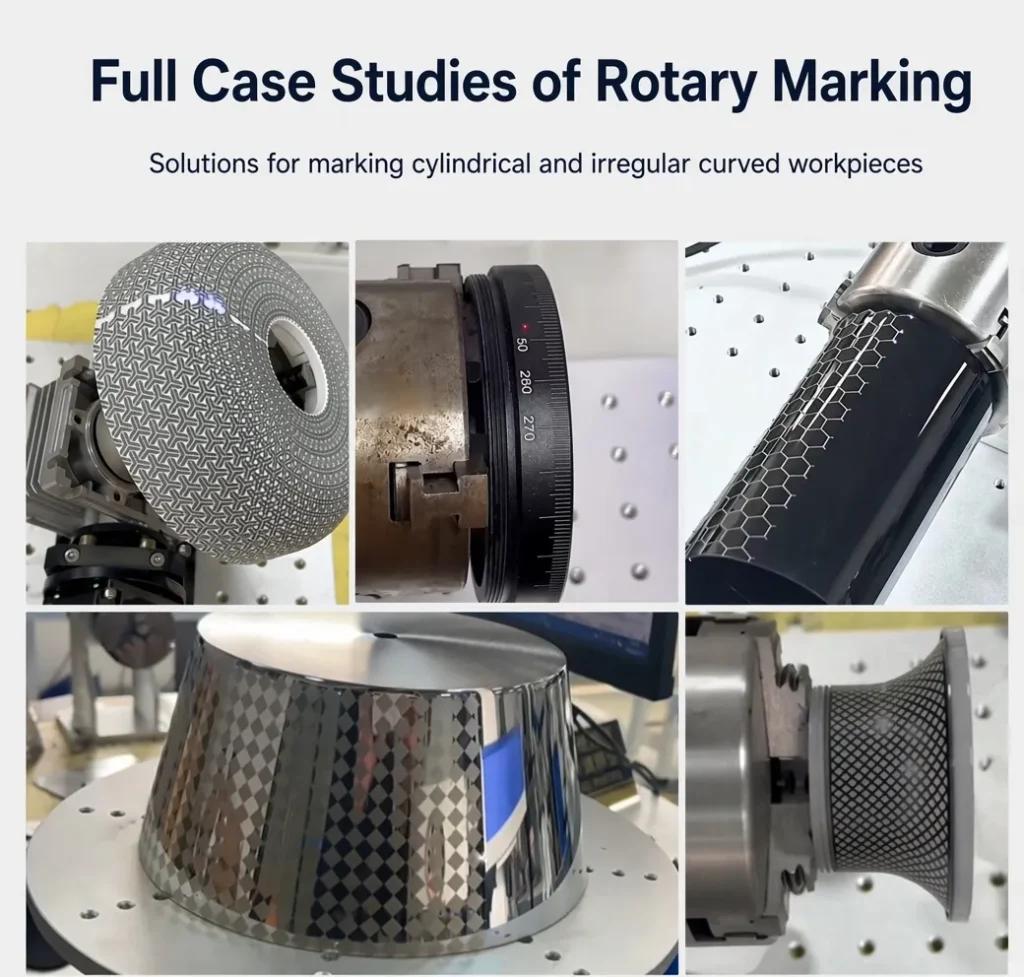
360° Rotary Laser Marking for Round Parts
When a product requires identification around a curved surface, a rotary axis can turn the workpiece while the laser follows the programmed marking path. This approach is suitable for many cylindrical and circular components.
Rings & Jewelry
Mark logos, names, serial numbers and other fine graphics on rings and round jewelry.
Metal Shafts
Suitable for identification and traceability marking on cylindrical mechanical parts.
Tools & Components
Mark product numbers, specifications, logos and identification codes on round tools and components.
Tubes & Cylinders
Rotary marking can be used where a flat marking field cannot cover the required curved area.
How the Automatic Rotary Laser Marking Process Works
Load
Place the cylindrical part into the dedicated fixture.
Position
The fixture positions the workpiece relative to the laser.
Trigger
A sensor, button or PLC signal starts the marking cycle.
Rotate
The rotary axis turns the workpiece according to the programmed path.
Mark
The laser creates the required permanent identification.
Unload
Remove the marked product or transfer it to the next process.
Automatic Laser Marking Machine with Rotary Axis Configuration
Rotary laser marking systems are normally configured according to the actual workpiece. There is no single rotary attachment that is ideal for every cylindrical product. Diameter, length, weight, surface shape, marking position and production volume should be reviewed before selecting the final configuration.
| Configuration | Typical Purpose | Important Selection Factor |
|---|---|---|
| Rotary Chuck | Rings, shafts and round metal parts | Diameter, clamping method and weight |
| Roller Rotary | Cylindrical parts and containers | Product diameter and surface stability |
| Motorized Rotary Axis | Controlled angular marking | Rotation resolution and synchronization |
| Custom Fixture | Special or irregular components | Product geometry and loading method |
Which Laser Source Should You Choose?
The rotary axis controls workpiece rotation, but the laser source still needs to match the material and marking objective. JQ Laser can configure fiber, MOPA fiber, UV or CO2 laser systems depending on the application.
| Laser | Typical Materials | Typical Applications |
|---|---|---|
| Fiber | Stainless steel, aluminum, brass, copper, titanium and other metals | Serial numbers, QR codes, logos, barcodes and industrial identification |
| MOPA Fiber | Stainless steel, anodized aluminum and selected plastics | Color marking, high-contrast marking and fine applications |
| UV | Selected plastics, electronics, glass and sensitive materials | Fine marking and applications requiring lower thermal impact |
| CO2 | Wood, glass, coated materials, rubber and selected plastics | Packaging, bottles, non-metal products and product identification |
Automatic Rotary Laser Marking Machine Technical Specifications
The following specifications are reference configurations. Final specifications may change according to laser source, marking lens, rotary axis, fixture, automation and customer requirements.
| Laser Type | Fiber / MOPA Fiber / UV / CO2 |
|---|---|
| Fiber Power | 20W / 30W / 50W / 60W / 100W |
| Fiber Wavelength | 1064nm |
| Reference Marking Speed | Up to approximately 7,000 mm/s |
| Typical Marking Field | 110 × 110mm standard reference; other lenses available |
| Rotary System | Motorized rotary chuck / roller / customized rotary fixture |
| Positioning Accuracy | Approximately ±0.01mm reference |
| Control | Laser controller + PLC / I/O integration depending on system |
| Trigger | Manual trigger / sensor / PLC / encoder depending on configuration |
| Vision | Optional CCD / machine vision system |
| Software | EZCAD-compatible configuration |
Applications of Rotary Laser Marking
Automotive Components
Mark part numbers, serial numbers, logos and traceability codes on shafts, components and round parts.
Tools & Hardware
Suitable for cylindrical tools, mechanical components, fasteners and other industrial hardware.
Jewelry
Mark rings and other round jewelry with logos, names, codes and customized graphics.
Electronics
Mark identification information on suitable cylindrical electronic and electrical components.
Medical Components
Use permanent identification and traceability marking on suitable metal components and instruments.
Bottles & Cylinders
Rotary configurations can be used for selected metal, glass or plastic cylindrical products depending on material.
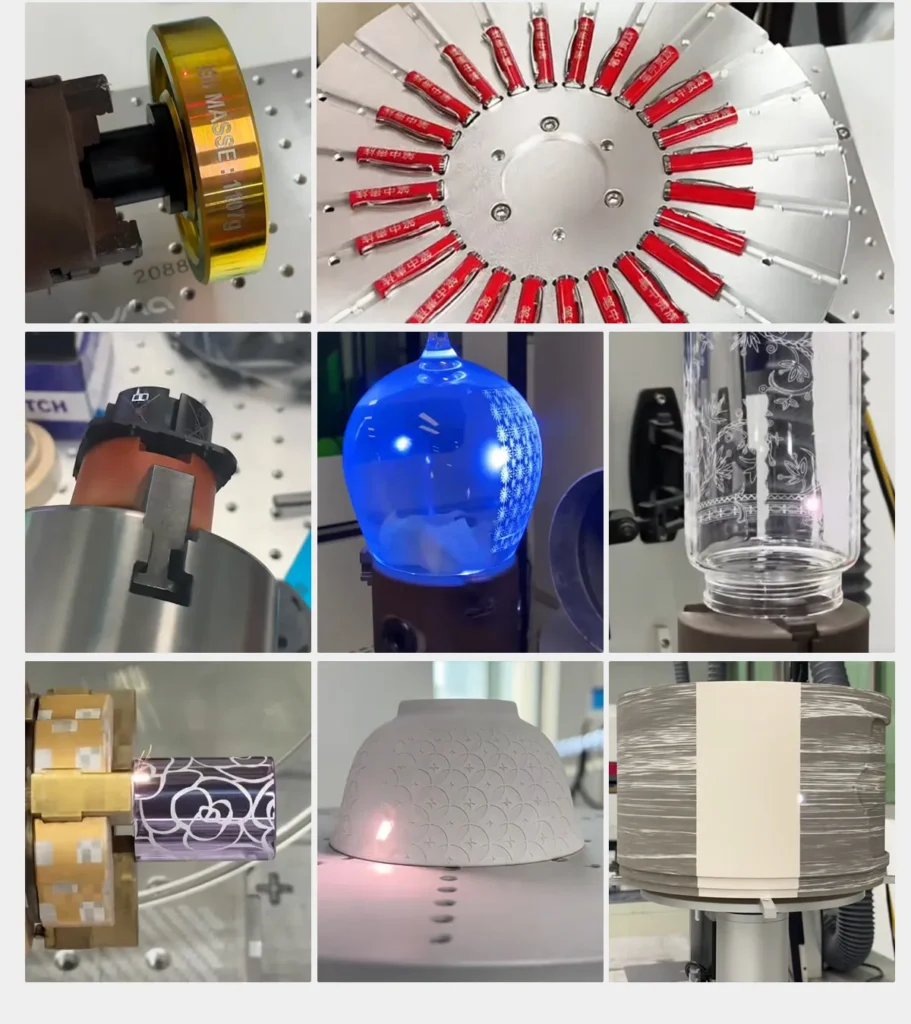
Automatic Rotary Laser Marking vs Manual Marking
| Factor | Manual Setup | Automatic Rotary System |
|---|---|---|
| Workpiece Positioning | Operator positioning | Dedicated fixture / programmed positioning |
| Round Surface | More manual adjustment | Controlled rotary movement |
| Variable Data | Manual or semi-automatic | Can integrate with control/data systems |
| Production Volume | Suitable for lower-volume work | More attractive for repetitive production |
| Automation Integration | Limited | PLC, sensor, conveyor and vision options |
How to Choose the Right Automatic Rotary Laser Marking Machine
1. Measure the Workpiece
Provide the minimum and maximum product diameter, length and weight. These dimensions determine which rotary mechanism and fixture can be used.
2. Define the Marking Area
Tell the supplier exactly where the mark needs to appear. Marking one small section, marking around the circumference and marking multiple positions require different configurations.
3. Confirm the Material
Stainless steel, aluminum, brass, copper, coated metal, plastic, glass and other materials may require different laser wavelengths and process parameters.
4. Calculate the Required Cycle Time
Do not select a machine based only on the advertised scanning speed. The actual production cycle includes loading, positioning, rotation, marking, inspection and unloading.
5. Decide the Automation Level
For simple batches, a rotary attachment on a standard marking machine may be sufficient. Higher-volume production may justify sensors, PLC control, vision inspection, conveyors or robotic loading.
6. Test Your Actual Product
For a serious production project, sample testing should be performed using the actual material, marking content and workpiece geometry before final configuration.
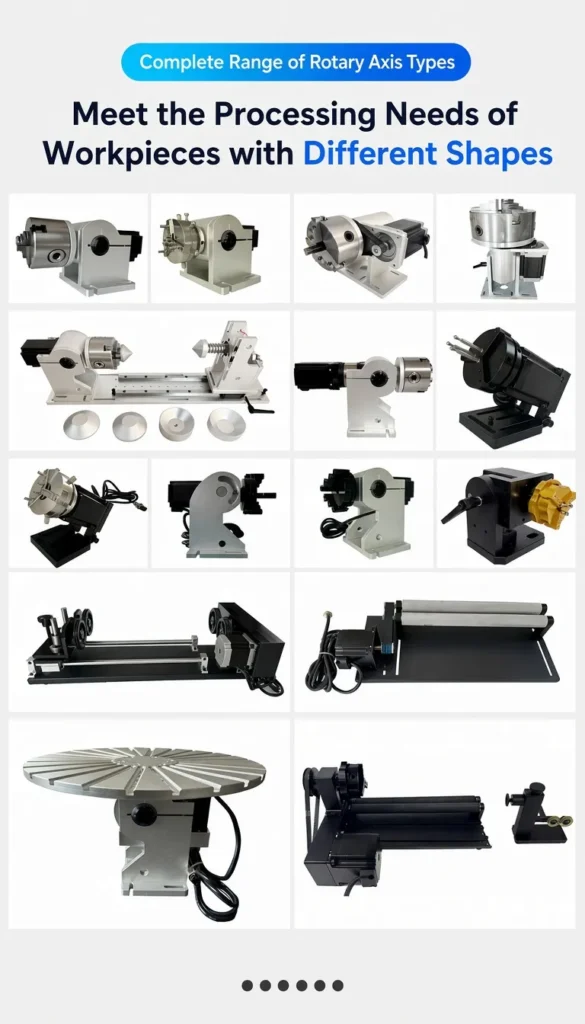
JQ Laser Automatic Rotary Marking Solution
JQ Laser can configure automatic rotary laser marking systems around the customer’s actual workpiece and production process. Instead of selecting the rotary axis separately from the laser system, we recommend evaluating the laser source, lens, rotary mechanism, fixture and control method as one application.
Fiber, MOPA Fiber, UV or CO2 according to material and marking requirements.
Rotary chuck, roller or customized motorized fixture.
Laser controller with optional PLC, sensor and I/O integration.
Optional camera inspection or positioning for applications that require it.
How We Test an Automatic Rotary Laser Marking System Before Shipment
A rotary laser marking project is not only about whether the laser can produce a good mark. The rotary axis, fixture, positioning, software and control signals must work together. Before delivery, the system should therefore be checked as an integrated machine.
01. Laser Output
Check laser operation and marking stability.
02. Sample Marking
Test the customer’s actual marking content and material where available.
03. Rotary Positioning
Verify rotation, fixture positioning and repeatability.
04. Automation Sequence
Check loading, trigger, rotation, marking and completion sequence.
05. PLC / I/O
Verify external trigger and machine-control signals when included.
06. Software
Check marking files, variable data and operating functions.
07. Safety Functions
Check applicable emergency stop, interlock and protective functions.
08. Final Run Test
Run repeated marking cycles before packing and delivery.

LEO — Sales Engineer, JQ Laser
LEO has more than 10 years of experience in laser marking and has worked with applications across multiple industries, including automation marking project design and implementation.
Frequently Asked Questions
Can the rotary axis mark around a complete cylinder?
Yes. A suitable motorized rotary configuration can rotate cylindrical workpieces during marking. The actual marking coverage depends on the workpiece geometry, rotary mechanism, laser field and application requirements.
What products can be marked with a rotary axis?
Typical applications include rings, shafts, cylindrical metal parts, tools, tubes, selected bottles, mechanical components and other round products.
Can I use a fiber laser with the rotary axis?
Yes. Fiber laser systems are commonly used for metal cylindrical parts. The appropriate laser power and lens should be selected according to the material, marking content and production requirements.
Can the rotary axis be connected to a PLC?
Yes, PLC and I/O integration can be included in an automated system. The exact interface and control sequence should be defined according to the production line requirements.
Can the machine mark QR codes and serial numbers?
Yes. QR codes, Data Matrix codes, serial numbers, barcodes, logos, text and other vector or bitmap graphics can be used depending on the marking software and application.
How do I choose the right rotary axis?
Start with the product diameter, length, weight, material, marking position and required production cycle time. Send these details to the supplier so the rotary mechanism and fixture can be evaluated together.
Do you provide sample testing?
JQ Laser can evaluate customer samples and marking requirements before recommending a final laser and rotary configuration.
Related Laser Marking Solutions
Explore complete industrial laser automation solutions.
Automatic Laser Marking Machine with ConveyorFor inline and conveyor-based production applications.
Fiber Laser Marking MachineGeneral-purpose metal laser marking solutions.
MOPA Fiber Laser Marking MachineFor color marking and more demanding fine-marking applications.
UV Laser Marking MachineExplore UV solutions for plastics, electronics and sensitive materials.
Laser Marking ROI CalculatorEstimate potential production savings and payback.
Need a Rotary Laser Marking Solution for Your Product?
Send us your product dimensions, material, marking content and production requirements. Our laser engineers can recommend the appropriate laser source, rotary axis and automation configuration.