Table of Contents
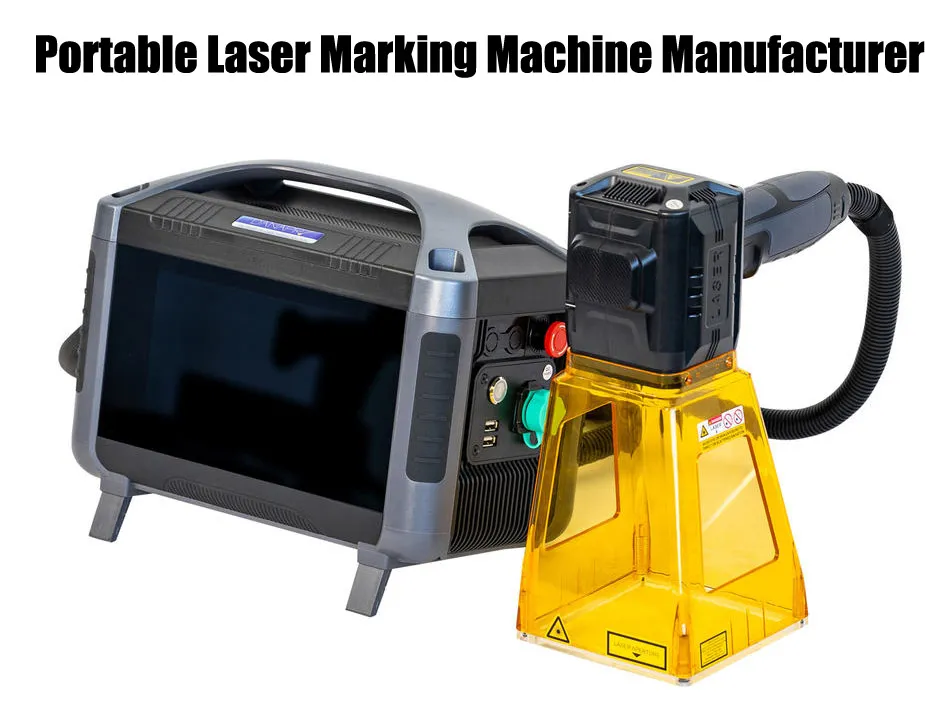
A good portable laser marking machine should make it easier to mark large, heavy or hard-to-reach metal parts. It should not simply be a smaller machine with a handle. Before choosing a manufacturer, check the actual machine weight, marking-head handling, battery configuration, marking performance, safety arrangements and the support available after delivery.
Here is the advice I would give a distributor or factory buyer: do not choose a portable laser by wattage or advertised portability alone. First decide where you will use it, what parts you need to mark, how long you need to work between power connections, and how repeatable the mark must be.
A 20W model may be enough for logos, serial numbers and QR codes on metal parts. A 30W model can be a practical middle ground for general industrial work. A 50W model is worth evaluating when you need more processing capacity or deeper engraving. But higher power does not automatically make a handheld job easier. The head, cable, fixture, operator position and safety controls all matter.
The 7 buyer checks
- Confirm what “portable” actually means for your job.
- Check real weight, battery capacity and power options.
- Verify the laser configuration and marking performance.
- Test your actual workpiece, not a supplier’s demonstration sample.
- Evaluate positioning, software and operator workflow.
- Check laser safety and the working environment.
- Confirm quality control, spare parts and after-sales support.
1. Confirm What “Portable” Actually Means for Your Job
This sounds obvious, but it is where many buyers start with the wrong expectation.
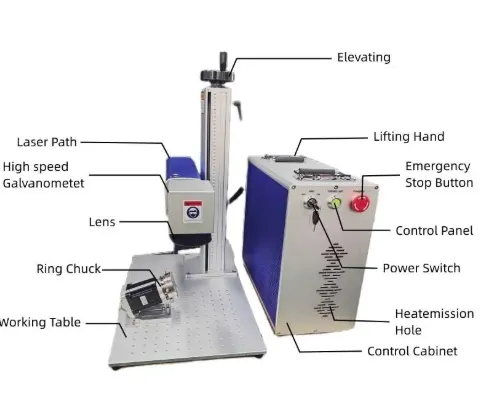
Some suppliers use the word portable for a compact desktop machine that can be moved between workbenches. Others mean a handheld marking head that the operator brings to a large workpiece. A battery-powered system is another category.
These machines solve different problems.
Three practical types of portable laser marking systems
| Type | Typical use | Main advantage | What to watch |
|---|---|---|---|
| Compact movable marker | Small and medium parts moved between workstations | Easy to relocate around a workshop | The workpiece may still need to be brought to the machine |
| Handheld marking system | Large, heavy or installed metal components | The marking head can be brought to the workpiece | Operator stability, head handling and safe positioning |
| Battery-powered handheld system | Outdoor, remote or power-limited locations | Less dependence on a nearby mains outlet | Battery capacity, charging time and actual working duration |
When a handheld system makes practical sense
Consider a factory making large steel frames. Moving every frame to a fixed marking station may require a forklift, additional labor and valuable floor space.
A portable handheld system can bring the marking head to the component instead.
Typical applications include:
- Marking serial numbers on large metal frames.
- Marking logos and identification information on steel structures.
- Marking model numbers on large machinery housings.
- Marking batch numbers on metal pipes and fittings.
- Marking identification codes on heavy equipment.
- Maintenance and field-service identification on suitable metal components.
For these jobs, portability can reduce workpiece handling. That is often more valuable than a small difference in scanner speed.
When portable is not the best choice
If you are marking thousands of small, identical parts every shift, a fixed workstation with a dedicated fixture may be more consistent and efficient.
If your production line needs automatic part feeding, camera inspection or synchronized conveyor marking, evaluate an automatic or integrated system instead.
Practical rule: Buy a portable machine because your workpiece or working location requires mobility—not because the product photograph makes the machine look convenient.
2. Check Real Weight, Battery Capacity and Power Options
A portable machine can look compact in a product photo but feel very different after an operator has used it for a full shift.
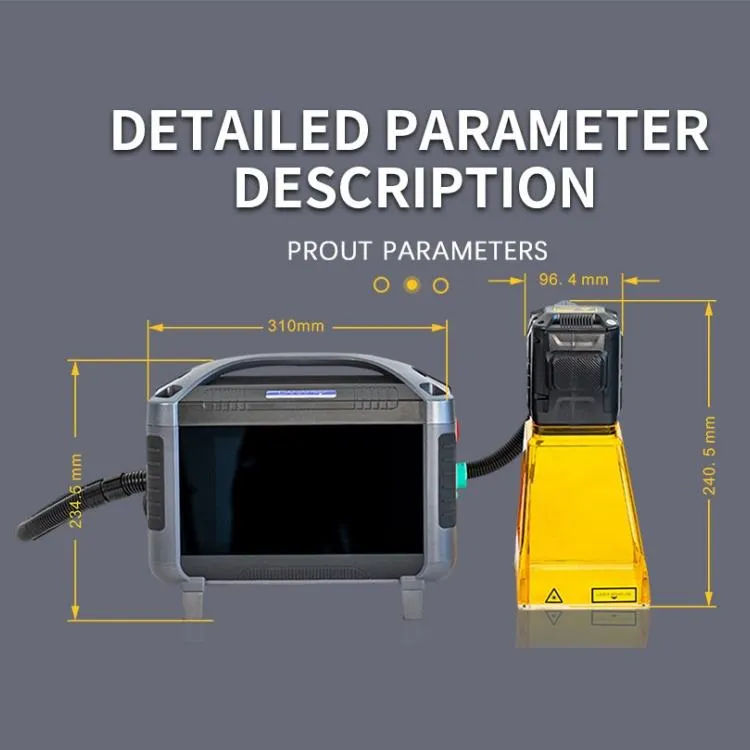
Ask for the weight of the actual configuration, not just the laser head or the main control unit.
JQ Laser handheld machine: published manual specifications
The following figures are taken from the JQ Laser handheld laser marking machine manual. They describe the configurations covered by that manual, not every portable laser model on the market.
| Parameter | 20W | 30W | 50W |
|---|---|---|---|
| Laser type | Fiber | Fiber | Fiber |
| Wavelength | 1064nm | 1064nm | 1064nm |
| Machine weight | 6–6.8kg | 6–6.8kg | 8–8.8kg |
| Battery capacity | 216Wh | 216Wh | 333Wh |
| Marking field options | 70×70 / 100×100mm | 70×70 / 100×100mm | 70×70 / 100×100mm |
| Focus lens | 130mm | 130mm | 130mm |
| Reference marking speed | Less than 7,000mm/s | Less than 7,000mm/s | Less than 7,000mm/s |
<small>Source: JQ Laser Handheld Laser Marking Machine User Manual, Equipment Parameters section. Confirm the nameplate and quotation for the exact machine being ordered.</small>
What do these weight figures mean in practice?
The manual lists approximately 6–6.8kg for the 20W and 30W models and 8–8.8kg for the 50W model.
That difference matters if operators need to move the equipment frequently or position the marking head at awkward angles.
Before ordering, ask the supplier to clarify:
- Whether the quoted weight includes the marking head, control unit and cables.
- Whether the battery is included in the stated weight.
- Whether a carrying case or trolley is available.
- How the cable is routed during operation.
- Whether the head can be supported by a fixture or adjustable bracket.
Do not assume the listed machine weight equals the weight an operator must hold continuously.
Battery capacity is not the same as working time
The manual lists:
- 216Wh for 20W and 30W battery configurations.
- 333Wh for the 50W battery configuration.
These are battery energy capacities, not guaranteed operating hours.
Actual runtime depends on the system’s total electrical consumption, marking duty cycle, screen use, ambient temperature, battery condition and operating pattern.
The manual also lists overall power consumption of approximately 145–250W. A simple theoretical calculation illustrates why the distinction matters:
[
\text{Ideal runtime}=\frac{\text{Battery capacity (Wh)}}{\text{Average load (W)}}
]
For example, 216Wh divided by a continuous 180W load gives 1.2 hours before accounting for conversion losses, battery reserve and operating conditions. This is a calculation example, not a measured runtime claim for the JQ machine.
Ask the manufacturer for a runtime test under a defined duty cycle. A useful test should record the battery starting level, workpiece, marking content, operating pattern and time until the agreed low-battery threshold.
AC or battery: which should you choose?
| Working condition | More practical configuration |
|---|---|
| Workshop with nearby power outlets | AC-powered configuration |
| Large factory floor with occasional relocation | AC or battery, depending on cable and outlet access |
| Outdoor or remote marking | Battery version, after runtime validation |
| Long continuous production shift | AC power or a planned battery replacement/charging arrangement |
| Field service with unpredictable locations | Battery configuration with a tested charging and transport plan |
If you work outdoors, also confirm the permitted temperature, moisture and dust conditions. The JQ manual lists an operating temperature range of 0–40°C and advises keeping the equipment dry and avoiding prolonged use in rain or high-humidity conditions.
3. Verify the Laser Configuration and Actual Marking Performance
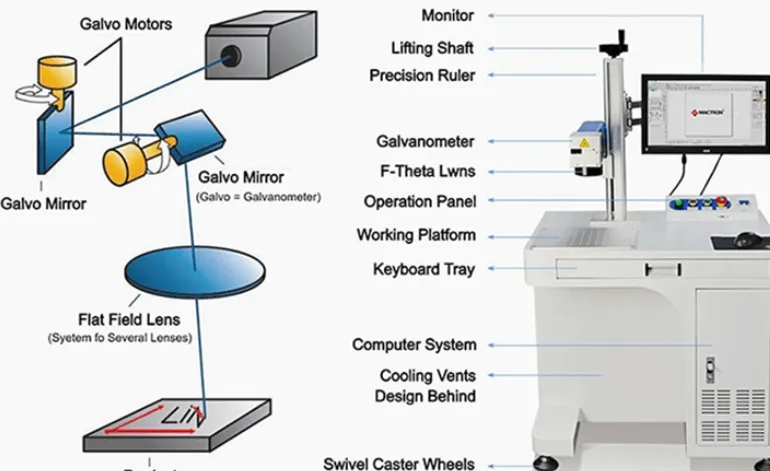
A portable laser marking machine is still a complete optical and electronic system. The fact that it is handheld does not make component selection less important.
Ask the supplier to identify the following:
| Component | What to confirm |
|---|---|
| Fiber laser source | Manufacturer, exact model, rated power and wavelength |
| Galvanometer system | Scanner model and supported marking field |
| F-theta lens | Focal length, marking area and working distance |
| Controller | Control system model and available I/O functions |
| Screen and software | Operating system, interface language and file compatibility |
| Power system | AC input, battery option and charging arrangement |
| Marking head | Weight, cable arrangement and focusing method |
JQ Laser handheld manual: additional technical references
The manual lists the following specifications for the covered 20W, 30W and 50W configurations:
| Item | Published manual reference |
|---|---|
| Wavelength | 1064nm |
| Marking field | 70×70mm or 100×100mm |
| Focus lens | 130mm |
| Reference marking speed | Less than 7,000mm/s |
| Line width | 0.03mm |
| Repeatability | 0.01mm |
| Positioning | Red-light positioning and focusing |
| Control screen | 8-inch capacitive integrated screen |
| Operating system | Linux |
| Power input | 110V / 220V AC |
| File formats | BMP, DXF, PNG, JPEG and PLT |
These are manual-listed reference specifications. A buyer should confirm the exact lens, field, laser source and performance conditions in the quotation and acceptance test.
Do not confuse scanner speed with finished-part output
A supplier may advertise a maximum marking speed of several thousand millimeters per second. That figure does not tell you how many finished parts you can mark in an hour.
Actual cycle time also depends on:
- The amount of text or graphics.
- QR-code size and data density.
- Hatch spacing and number of passes.
- Material and surface condition.
- Focus and positioning.
- Operator handling and workpiece access.
- Inspection and repositioning time.
For a handheld machine, operator positioning can be a bigger production variable than the laser’s maximum scanner speed.
What about the 20W, 30W and 50W choice?
20W: Evaluate it first for logos, serial numbers, QR codes and general metal identification where the required mark can be achieved within the production target.
30W: Consider it when you want additional processing capacity for general workshop use or a wider range of marking jobs.
50W: Evaluate it when the application needs more processing capacity, deeper engraving or a shorter marking cycle. Remember that the 50W configuration in the manual is heavier than the 20W and 30W versions.
Higher power is not automatically better for every job. The actual sample, marking depth, contrast, cycle time and operator handling should decide the purchase.
4. Test Your Actual Workpiece Before You Buy
This is the test I would insist on before recommending a portable fiber laser to a customer.
Do not approve the machine using only a supplier’s stainless-steel demonstration plate. Your workpiece may have a different alloy, coating, surface finish or geometry.
Application A: Large steel frames and machine bases
Customer requirement: Permanent equipment identification, serial numbers, logos and manufacturing information.
What to test:
- Can the operator position the marking head safely?
- Is the working distance manageable?
- Can the required marking area be reached?
- Does the mark remain readable on the actual surface?
- Can the operator repeat the position without a dedicated fixture?
Common problem: The mark looks good on a small flat sample, but the real machine frame has welds, uneven surfaces or limited access.
Practical solution: Send a photo with dimensions and, if possible, a representative workpiece. Test the actual marking position rather than a convenient flat coupon.
Application B: Metal pipes and cylindrical components
Customer requirement: Marking batch numbers, product specifications, logos or traceability codes on pipe surfaces.
What to test:
- Pipe diameter and surface curvature.
- Head positioning and working distance.
- Whether the mark stays within the required area.
- Whether a positioning guide or fixture is needed.
- Whether the operator can keep the head stable.
Common problem: A mark on a flat plate is clean, but the result on a curved pipe is distorted or uneven.
Practical solution: Test the actual pipe diameter and surface condition. For repeated production, consider a dedicated support or fixture rather than relying entirely on freehand positioning.
Application C: Steel tools, blades and metal parts
Customer requirement: Marking logos, specifications, product codes and serial numbers.
What to test:
- Small text readability.
- Logo edge quality.
- Marking time per part.
- Repeatability across multiple parts.
- Whether the required mark is surface marking or deeper engraving.
Common problem: The supplier demonstrates a large logo, but the buyer’s actual artwork contains small text and dense specifications.
Practical solution: Send the final production artwork and test it at the intended marking size. Ask for multiple samples and record the cycle time.
Application D: On-site maintenance and field service
Customer requirement: Marking installed equipment or large components that cannot be moved to a workshop.
What to test:
- Access to the marking position.
- Available power or battery runtime.
- Operator working position.
- Environmental conditions.
- Safety boundaries and control of bystanders.
- Whether the workpiece surface is clean and suitable.
Common problem: The machine is portable, but the site has no suitable power, poor lighting, restricted access or an uncontrolled working area.
Practical solution: Conduct a site assessment before choosing the battery or AC configuration. Portability does not remove the need for a controlled laser-working area.
The sample-test report you should request
| Test item | Required record |
|---|---|
| Material | Grade, coating, finish and dimensions |
| Marking content | Actual logo, text, serial number or QR code |
| Laser | Power, source model and wavelength |
| Lens | Focal length and marking field |
| Parameters | Power, speed, frequency, hatch and passes where applicable |
| Result | Contrast, readability, edge quality and defects |
| Depth | Measured value if engraving depth is required |
| Cycle time | Start and end points clearly defined |
| Repeatability | Several samples, not just one selected result |
| Operator conditions | Positioning method, support and working distance |
A sample test should answer one question: Can this exact configuration produce the result your customer needs, under conditions that can be repeated?
5. Evaluate Positioning, Software and Operator Workflow
For portable marking, a good laser source is only part of the job. Operators need to position the head, set the focus, load the correct file and avoid marking the wrong location.
A confusing interface can slow down a machine that is otherwise capable of good marking.
What the JQ handheld manual describes
The manual covers:
- An 8-inch capacitive integrated screen.
- Linux-based operating system.
- Red-light positioning and focusing.
- Text and serial-number editing.
- QR-code and barcode creation.
- File management and USB transfer.
- BMP, DXF, PNG, JPEG and PLT file formats.
- Production-line functions and I/O settings.
It also describes serial-number functions such as start value, end value, step value, repetition and reset.
These functions are useful for distributors whose customers need to mark different products without connecting a separate computer for every job. However, confirm the software version and the exact functions enabled on the machine you are purchasing.
Ask these practical questions
- Can the operator create text directly on the screen?
- Can serial numbers increase automatically?
- Can a QR code or barcode be created on the machine?
- Can files be transferred using USB?
- Can the operator preview the marking position?
- Is there a clear procedure for focusing and calibration?
- Can the system receive external start signals if required?
A real workflow test
Ask the supplier to demonstrate this sequence:
- Power on the machine.
- Select an approved marking file.
- Position the head on the actual workpiece.
- Focus and preview the marking position.
- Mark a sample.
- Change the serial number or QR-code data.
- Mark a second sample.
- Save or retrieve the file.
Watch how many steps require a technician. A machine that is easy for an experienced engineer may still be difficult for a new operator.
6. Check Laser Safety Before You Choose a Portable Machine
This is not a detail to leave until after delivery.
The JQ handheld manual warns that the emitted laser radiation exceeds Class 1 levels and recommends protective eyewear with OD3. It also instructs operators not to expose eyes or skin to direct or reflected laser radiation and not to point the marking head toward people or animals.
The exact safety arrangement must be checked for the delivered machine and the country where it will be used.
What to confirm with the manufacturer
- The laser classification of the complete machine in its actual operating configuration.
- The required protective eyewear specification for the 1064nm wavelength.
- Whether the machine has an interlock or other protective control.
- Whether a shield, guard or controlled marking enclosure is required.
- How the working area is controlled.
- What safety labels and operating instructions are supplied.
- Whether local regulations require additional measures.
Important: Do not assume that eyewear marked with a generic OD value is automatically suitable. The eyewear must be rated for the actual laser wavelength and required optical density, and must be appropriate for the exposure conditions. Follow the machine’s safety documentation and applicable local laser-safety requirements.
Control reflections and the surrounding area
Metal surfaces can reflect laser radiation. Before marking, assess the workpiece surface and nearby objects. Keep unnecessary personnel outside the controlled area and prevent the beam from being directed toward people or reflective surfaces.
Consider fumes and extraction
Marking painted, plated, coated or contaminated parts may generate fumes or airborne particles. The right extraction arrangement depends on the material and coating.
For example, marking a coated metal component is not the same as marking clean stainless steel. Identify the coating and review the relevant material safety information before production.
When portable operation is not appropriate
Do not use a handheld machine in an uncontrolled public area simply because the workpiece is outdoors. A portable design does not remove laser safety requirements.
If the site cannot provide a suitable controlled area, protective measures and trained operators, stop and evaluate a safer machine configuration or process.
7. Confirm Quality Control, Spare Parts and After-Sales Support
A portable laser marking machine may be used at different workstations, production areas or customer sites. That makes service and troubleshooting especially important.
If your customer reports that the marking position has shifted, the mark has become weak or the machine will not start, you need a supplier who can help identify the cause.
What should be checked before shipment?
| Inspection item | What to verify |
|---|---|
| Laser output | Correct model and agreed output configuration |
| Marking head | Physical condition, focusing and positioning |
| Lens | Correct focal length and marking field |
| Control screen | Startup, touch response and interface |
| Software | File import, text, serial number and QR-code functions |
| Power | AC operation and battery charging, if included |
| Battery | Model, capacity and charging arrangement |
| I/O functions | Test only the functions included in the order |
| Accessories | Cables, charger, protective items and agreed options |
| Marking sample | Approved artwork and workpiece result |
Ask for a pre-shipment inspection record linked to the machine serial number. If you are ordering multiple units, clarify whether each machine will be tested or whether a sampling arrangement applies.
Spare parts and technical support
Before ordering, ask:
- Which parts can be replaced separately?
- How are the laser source, lens and controller identified?
- Can the supplier provide remote troubleshooting?
- Is operator training included?
- What information should be sent when reporting a fault?
- What is the warranty period and what does it exclude?
- Who pays for replacement-part shipping?
- Can the supplier support the same configuration in future orders?
A useful supplier should be able to explain the troubleshooting process, not simply say, “Contact us if there is a problem.”
Portable Laser Marking Machine Purchasing Checklist: 7 Checks Before You Order
Use this checklist to compare manufacturers. Each item includes the working condition, the evidence or test method, and the limitation.
Check 1 – Portability for the Actual Workpiece
- Applicable condition: You mark large, heavy, installed or hard-to-reach metal components.
- Evidence / test method: Demonstrate the machine on the actual workpiece or a representative part. Record access, positioning, working distance, cable routing and whether the head needs support.
- Limitations: Portable does not mean effortless. Operator posture, head weight, cable management and restricted access can make some jobs difficult.
Check 2 – Total Weight and Battery Runtime
- Applicable condition: You work outdoors, move between workstations or need to mark parts away from fixed power outlets.
- Evidence / test method: Request the weight of the complete delivered configuration. For battery models, conduct a runtime test under an agreed duty cycle and record the battery capacity, average load and operating pattern.
- Limitations: Battery capacity in Wh does not guarantee a specific number of operating hours. Runtime changes with load, battery condition, temperature and usage.
Check 3 – Laser Source and Optical Configuration
- Applicable condition: You need a defined marking field, small text, QR codes, consistent positioning or a particular engraving result.
- Evidence / test method: Obtain the laser source model, rated power, wavelength, scanner, lens focal length and marking field in writing. Test the actual artwork using the quoted configuration.
- Limitations: A component specification does not guarantee the performance of the complete machine. A larger marking field may also affect detail and energy density.
Check 4 – Material and Marking Sample
- Applicable condition: Your products have different metal grades, coatings, surface finishes or marking requirements.
- Evidence / test method: Send representative samples and final artwork. Request multiple marked parts, recorded parameters, cycle time and measured depth where needed.
- Limitations: A successful sample on one material batch does not guarantee the same result on every coating, alloy or surface condition.
Check 5 – Positioning and Software Workflow
- Applicable condition: Operators need to create serial numbers, QR codes, barcodes or frequently changing product information.
- Evidence / test method: Ask the supplier to demonstrate the complete operator workflow, including file import, preview, focus, marking, serial-number changes and file retrieval.
- Limitations: Software features vary by controller and version. Confirm that the functions you need are included in the purchased configuration.
Check 6 – Laser Safety and Work Environment
- Applicable condition: The machine is used in a workshop, factory, maintenance area or outdoor site.
- Evidence / test method: Review the machine’s laser classification, wavelength-specific eyewear requirements, protective controls, safety instructions and fume-extraction needs. Assess the actual work area.
- Limitations: A supplier’s standard safety accessories may not satisfy every local installation requirement. The buyer remains responsible for confirming applicable site and regulatory requirements with qualified personnel.
Check 7 – Quality Inspection and After-Sales
- Applicable condition: You are purchasing for production use, resale or a customer who depends on the machine for daily operations.
- Evidence / test method: Request a serial-number-linked inspection report, approved sample, accessory list, warranty terms, spare-parts information and troubleshooting procedure.
- Limitations: A short pre-shipment test cannot prove long-term reliability. Critical applications may require a longer run test and a more detailed acceptance procedure.
Comparison Table: How to Compare Portable Laser Manufacturers
| Buyer requirement | Manufacturer with strong evidence | Warning sign |
|---|---|---|
| Portability | Demonstrates the machine on a representative workpiece | Uses only product photos |
| Weight | Gives complete machine and accessory weights | Lists only laser-head weight |
| Battery | States Wh and provides a defined runtime test | Promises “all-day battery” without conditions |
| Laser configuration | Identifies source, scanner, lens and controller | Only advertises 20W / 30W / 50W |
| Marking result | Tests the buyer’s actual material and artwork | Shows unrelated samples |
| Cycle time | Measures the complete marking operation | Quotes scanner speed as production output |
| Software | Demonstrates the required workflow | Says “easy to use” without a demonstration |
| Safety | Supplies configuration-specific safety instructions | Treats safety glasses as the only safety measure |
| Inspection | Provides actual machine inspection records | Says “100% tested” without evidence |
| After-sales | Defines warranty, parts and troubleshooting | Offers only vague lifetime support |
How to make the decision: Choose the manufacturer that can demonstrate the machine under your real working conditions. The lowest price is not necessarily the lowest total cost if the machine is difficult to handle, has insufficient battery capacity or cannot produce a repeatable mark.
JQ Laser Portable Fiber Laser Marking Machine: What to Confirm
JQ Laser publishes portable fiber laser marking machine configurations covering 20W, 30W, 50W and 100W options. The separate handheld machine manual covers 20W, 30W and 50W models.
For the handheld configurations described in that manual, the published references include:
- 1064nm fiber laser.
- 70×70mm or 100×100mm marking field options.
- 130mm focus lens.
- Less than 7,000mm/s reference marking speed.
- 0.03mm line width and 0.01mm repeatability.
- 8-inch integrated touchscreen and Linux operating system.
- 110V / 220V AC power options.
- Battery options of 216Wh for 20W/30W and 333Wh for 50W.
The 100W option listed on the portable product-family page should not be assumed to share the handheld manual’s weight, battery, lens or marking-field specifications. Confirm the exact model and configuration before ordering.
What applications can be discussed?
Depending on material, workpiece geometry and the marking requirement, JQ Laser can evaluate applications such as:
- Steel structures and large metal frames.
- Machinery housings and equipment nameplates.
- Metal pipes, fittings and industrial components.
- Metal tools and hardware products.
- Serial numbers, logos, QR codes and traceability information.
- On-site identification of suitable metal workpieces.
For each application, the correct configuration should be selected through a sample test rather than by wattage alone.
Explore the relevant product and company pages:
- <a href=”https://fiberlasermarking.com/portable-laser-marking-machine/” target=”_blank” rel=”noopener”>Portable Fiber Laser Marking Machine</a>
- <a href=”https://fiberlasermarking.com/handheld-laser-marking-machine-user-manual/” target=”_blank” rel=”noopener”>Handheld Laser Marking Machine User Manual</a>
- <a href=”https://fiberlasermarking.com/fiber-laser-marking-machine/” target=”_blank” rel=”noopener”>Fiber Laser Marking Machine Range</a>
- <a href=”https://fiberlasermarking.com/about/” target=”_blank” rel=”noopener”>About JQ Laser</a>
- <a href=”https://fiberlasermarking.com/contact/” target=”_blank” rel=”noopener”>Contact JQ Laser</a>
What Information Should You Send When Requesting a Quote?
If you want a useful quotation rather than a generic price, send the manufacturer the following information.
| Information | Example |
|---|---|
| Workpiece | Steel frame, pipe, machine housing or tool |
| Material | Stainless steel, carbon steel, aluminum or coated metal |
| Workpiece dimensions | Length, width, diameter and marking position |
| Marking content | Logo, serial number, QR code, barcode or text |
| Marking size | Actual width and height |
| Required result | Surface identification, high contrast or measured depth |
| Production quantity | Parts per day or per shift |
| Working location | Workshop, production floor, outdoor or field service |
| Power access | 110V / 220V AC or battery requirement |
| Operator workflow | Handheld operation, support fixture or dedicated positioning |
| Destination market | Country and applicable electrical requirements |
If possible, send a clear photo of the workpiece with a ruler showing the intended marking position. A short video showing the access problem can also help the engineering team understand why a portable system is needed.
Final Advice: Buy the Working Solution, Not Just the Portable Machine
A portable laser marking machine is valuable when it solves a real handling or access problem. It can reduce the need to move large components, help operators mark different positions and make field identification more practical.
But portability alone does not guarantee good production results.
Before choosing a portable laser marking machine manufacturer, make sure you have verified:
- The machine can reach and mark your actual workpiece.
- The complete machine weight is manageable for the intended workflow.
- Battery capacity and runtime match the working pattern.
- The laser configuration can produce the required mark.
- Operators can position, focus and use the software reliably.
- The safety arrangements suit the actual working environment.
- The supplier can provide inspection evidence, spare parts and technical support.
At JQ Laser, we recommend starting with your workpiece, marking content, working location and expected daily output. Once we understand those details, we can discuss whether 20W, 30W or 50W is appropriate and whether an AC or battery configuration makes more sense.
<a href=”https://fiberlasermarking.com/contact/” target=”_blank” rel=”noopener”>Send Your Workpiece and Marking Requirements to JQ Laser</a>
Frequently Asked Questions
1. What is a portable laser marking machine?
A portable laser marking machine is a movable or handheld laser marking system designed to mark parts in different locations. Some models use a handheld marking head, while others are compact units that can be moved between workstations. Battery-powered configurations are available on selected models.
2. What is the difference between a portable and a handheld laser marking machine?
Portable is a broad term describing equipment that can be moved. Handheld usually means the operator can position the marking head directly on or near the workpiece. Always check the actual structure and working method instead of relying on the product name.
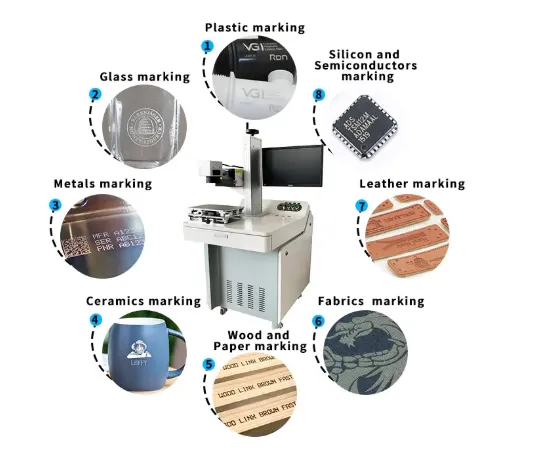
3. What materials can a portable fiber laser marking machine mark?
A 1064nm fiber laser is primarily used for metal marking. Applications may include stainless steel, carbon steel, aluminum, brass and selected coated metals. The result depends on the material, surface treatment and required marking appearance. Test the actual workpiece before ordering.
4. Should I choose 20W, 30W or 50W?
20W may be sufficient for many logos, serial numbers and QR codes. 30W can provide additional processing capacity for general industrial marking. 50W is worth evaluating for deeper engraving or higher processing requirements. The correct choice depends on sample results and cycle-time targets.
5. How long can a battery-powered portable laser work?
Battery runtime depends on battery capacity, total electrical load, marking duty cycle, temperature and battery condition. The JQ handheld manual lists 216Wh for 20W/30W and 333Wh for 50W configurations. These values do not guarantee a fixed number of working hours.
6. Can a portable laser marking machine mark large steel structures?
It can be suitable when the marking head can safely reach the required position and the operator can maintain the correct working distance. Test the actual structure, access and surface condition before selecting the machine.
7. Can a handheld fiber laser mark QR codes and serial numbers?
The JQ handheld manual describes QR-code, barcode and serial-number functions. Confirm the exact software version and data workflow on the model you plan to purchase.
8. Is a portable laser marking machine suitable for mass production?
It depends on the production volume and process. For small batches, varied parts or large workpieces, handheld operation may be practical. For high-volume identical parts requiring consistent positioning, a fixed fixture or automatic marking system may be more efficient.
9. Is a handheld fiber laser safe to use outdoors?
Outdoor use does not remove laser safety requirements. You still need a controlled working area, suitable wavelength-specific protective eyewear, protection against hazardous reflections and appropriate fume management. Also confirm the machine’s permitted temperature and moisture conditions.
10. What should I check before buying from a portable laser marking machine manufacturer?
Check the actual machine structure, complete weight, battery configuration, laser source, lens, marking field, sample result, software workflow, safety documentation, pre-shipment inspection and after-sales support.
Sources and Technical References
- JQ Laser – Portable Laser Marking Machine
https://fiberlasermarking.com/portable-laser-marking-machine/
Product-family information, typical power options, wavelength, marking-field options, power supply and configuration notes. - JQ Laser – Handheld Laser Marking Machine User Manual
https://fiberlasermarking.com/handheld-laser-marking-machine-user-manual/
Primary technical reference for the 20W, 30W and 50W handheld configurations, including machine weight, battery capacity, marking field, lens, control screen, software functions and safety instructions. - JQ Laser – About Us
https://fiberlasermarking.com/about/
Company-published information about machine assembly, laser testing, sample testing and technical support. - JQ Laser – Fiber Laser Marking Machine
https://fiberlasermarking.com/fiber-laser-marking-machine/
Product-family reference for fiber laser configurations. - U.S. Food and Drug Administration – Laser Products and Instruments
https://www.fda.gov/radiation-emitting-products/home-business-and-entertainment-products/laser-products-and-instruments
General regulatory information about laser products and laser safety. Check the applicable requirements in the country where the machine will be installed.
Technical and traceability note: The handheld machine figures in this article are taken from the JQ Laser handheld manual. The separate portable product-family page may describe configurations that differ from the handheld manual. Do not assume that the 100W portable product-family option has the same battery, weight or optical configuration as the 20W/30W/50W handheld models. The final quotation, machine nameplate and delivered manual should control the purchase decision.